Dialog (Part 2)
Our earlier dialog for the wizard is pretty simple; just a single fixed line. Now we're going to expand on it with multiple lines and responses from the player, but this will still remain a very basic dialog system; linear with no branches.
These are what we'll be adding to the dialog system, and how we will achieve it...
- Multiple lines of dialog
- Use an instance variable to keep track of which line of dialog we are at
- Increment the variable when the player press the A button
- Responses from the player
- Use a second text object to display the player's response
- Check the instance variable to determine which line to say
Multiple Lines of Dialog
We'll start by modifying the Wizard to have multiple lines of dialog. Let's have him speak these three lines.
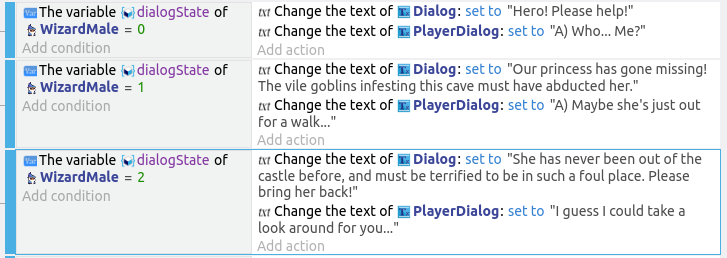
- "Hero! Please help!"
- "Our princess has gone missing! The vile goblins infesting this cave must have abducted her."
- "She has never been out of the castle before, and must be terrified to be in such a foul place. Please bring her back!"
Currently, under the Dialog group event, you should have a set of events that looks like this...

Add a condition to the second event. Select the Wizard and Value of an object variable. Set the variable name as dialogState, operator as = (equal to), and value as 0. Next, change the dialog to the first line.

Repeat for the other two lines of dialog, but set the checks for the dialogState value to 1 and 2.

Progressing through the Dialog
Now when you touch the wizard, he will only speak the first line of dialog. To progress through the remaining two lines, we'll need to change the value of dialogState. We'll use an event to detect if the A button is pressed, and increment dialogState if it is.
Select the Collision with wizard event, and add a sub-event under it. For the conditions, add...
- Touch or mouse button down
- Cursor / touch is on A Button
- Trigger once (...this is found under Other conditions, Advanced)
For the action, select the Wizard and Value of an object variable. Set the variable name to dialogState, the modification sign to + (add), and the value to 1.

Responses from the Player
Start by creating a new Text object, and name it PlayerDialog. Use a different font color to differentiate it from the NPC dialog, then place it within the dialog panel.
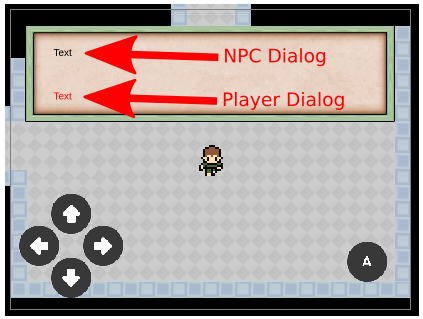
Just like the NPC dialog, we'll need to hide and show the PlayerDialog. Look for the actions where we hide and show the NPC dialog, and add in actions to hide and show the PlayerDialog as well.
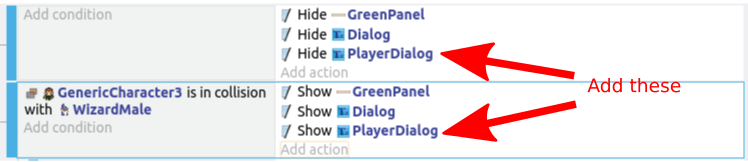
Now look for the events where we have the text of the wizard dialog, and add in actions for the player dialog.
Princess Dialog
Using the same method, add dialog for the princess. Start by adding a sub-event under the Dialog group event. This new sub-event should have the same conditions and actions as the existing Collide with wizard event (...but changed to princess).

Taking reference from the wizard dialog, create events for the princess dialog. It's up to you to decide what her lines will be.