Movenet
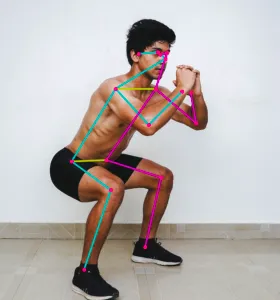
Movenet is a machine learning model that detects 17 keypoints of a body from an image or video.
You can use it for various purposes, such as...
- Control a robot to mimic a human pose
- Pilot a drone using body movement
- Create an exercise app that can count push-ups, detect yoga poses, etc
Capabilities
Movenet can run at 30+ FPS on most modern computers, and can detect the following keypoints...
| Keypoint | S/N |
|---|---|
| nose | 0 |
| left_eye | 1 |
| right_eye | 2 |
| left_ear | 3 |
| right_ear | 4 |
| left_shoulder | 5 |
| right_shoulder | 6 |
| left_elbow | 7 |
| right_elbow | 8 |
| left_wrist | 9 |
| right_wrist | 10 |
| left_hip | 11 |
| right_hip | 12 |
| left_knee | 13 |
| right_knee | 14 |
| left_ankle | 15 |
| right_ankle | 16 |
Given a image or video, Movenet will output the (x, y) coordinates of each of theses points (...provided they are visible in the image).
Limitations
Movenet cannot detect hand poses (eg. hands open or closed). It also cannot detect mouth, fingers, toes, etc. If needed, there are other models which can detect those.
Installation
To use Movenet, you will need to install a few libraries...
TensorFlow
This is the software library for machine learning. Follow the installation instructions here...
https://www.tensorflow.org/install/pip
TensorFlow_hub
Used for loading the Movenet model. In a terminal, run...
pip install tensorflow_hub
OpenCV
This is a computer vision library for processing the image. In a terminal, run...
pip install opencv-python
Alternative installation using LiteRT
LiteRT (...formerly known as TensorFlow Lite) provides a lighter (smaller install size, lower memory use) alternative to TensorFlow. When using LiteRT, you must use the LiteRT code at the bottom of this page; the rest of the code are meant for TensorFlow and will not work.
To install LiteRT on Linux systems (...including Raspberry Pi), first create and activate a new virtual environment...
python -m venv litert
source litert/bin/activate
On Mac and Windows, you can skip the above step. Next, you'll need to install LiteRT and OpenCV...
pip install ai-edge-litert
pip install opencv-python
Model Types
Movenet provides two models...
Thunder
Higher accuracy, lower performance. Note that Thunder expects the input image to be 256x256.
Lightning
Lower accuracy, higher performance. Note that Lightning expects the input image to be 192x192.
Both Thunder and Lightning can be downloaded here...
https://www.kaggle.com/models/google/movenet/tensorFlow2
Unpacking
You should extract the downloaded files into their own folder. In the examples below, it is assumed that the Thunder model files are extracted into a directory named movenet_singlepose_thunder_4, and the Lightning model files are extracted into a directory named movenet_singlepose_lightning_4.
Code (Display Only)
The code for using Movenet is rather complex, so we'll be breaking it up into multiple small steps. In this first step, we'll be using OpenCV to capture a video image and display it; there's actually no usage of Movenet here.
import cv2

cap = cv2.VideoCapture(0)

success, img = cap.read()

while success:
    cv2.imshow('Movenet', img)

    if cv2.waitKey(1) == ord("q"):
        break

    success, img = cap.read()

cap.release()
import cv2 : Imports the OpenCV module.
cap = cv2.VideoCapture(0) : Open camera 0 for video capture. If you have more than one camera, you can change this number to select a different camera.
success, img = cap.read() : Capture one image frame from the camera. It will return a success value indicating if it was successful, and the actual image img.
cv2.imshow('Movenet', img) : Displays the image on screen.
if cv2.waitKey(1) == ord("q"): : Checks if the "q" button was pressed. If it was, break out of the while loop. IMPORTANT: The previous imshow will not work without this waitKey.
cap.release() : Release the camera, allowing other programs to use it.
Code (Process Image)
In this example, we'll process the captured image to make it fit within the size that Movenet expects. Note that Thunder expects a 256x256 image, while Lightning expects 192x192. We are still not doing any Movenet detection yet.
import tensorflow as tf
import cv2
import numpy as np

cap = cv2.VideoCapture(0)

success, img = cap.read()

while success:
    tf_img = cv2.resize(img, (256,256))
    tf_img = cv2.cvtColor(tf_img, cv2.COLOR_BGR2RGB)
    tf_img = np.asarray(tf_img)

    image = np.expand_dims(tf_img,axis=0)
    image = tf.cast(image, dtype=tf.int32)

    cv2.imshow('Movenet', img)

    if cv2.waitKey(1) == ord("q"):
        break

    success, img = cap.read()

cap.release()
import tensorflow as tf : Imports the TensorFlow module.
import numpy as np : Imports the numpy module. This module is commonly used on Python for data processing.
tf_img = cv2.resize(img, (256,256)) : Resize the image to 256x256. If you're using Lightning, you'll need to change this to 192x192.
tf_img = cv2.cvtColor(tf_img, cv2.COLOR_BGR2RGB) : Change the color format. By default, it is in Blue-Green-Red (BGR), and we'll need to change it to RGB to suit Movenet.
tf_img = np.asarray(tf_img) : Converts the image into an numpy array.
image = np.expand_dims(tf_img,axis=0) : This adds a dimension to the image data. It's required for Movenet.
image = tf.cast(image, dtype=tf.int32) : This converts the image data into int32 format. It's required for Movenet.
Code (Single Keypoint Only)
In this example, we'll print out the position of a single keypoint (left eye). Note that the position is normalized (ie. the leftmost position is 0, the rightmost is 1.0, and the middle is 0.5).
import tensorflow as tf
import tensorflow_hub as hub
import cv2
import numpy as np

model = hub.load('movenet_singlepose_thunder_4')
movenet = model.signatures['serving_default']

cap = cv2.VideoCapture(0)

success, img = cap.read()

while success:
    tf_img = cv2.resize(img, (256,256))
    tf_img = cv2.cvtColor(tf_img, cv2.COLOR_BGR2RGB)
    tf_img = np.asarray(tf_img)

    image = np.expand_dims(tf_img,axis=0)
    image = tf.cast(image, dtype=tf.int32)

    outputs = movenet(image)
    keypoints = outputs['output_0']
    print(keypoints[0,0,1])

    cv2.imshow('Movenet', img)

    if cv2.waitKey(1) == ord("q"):
        break

    success, img = cap.read()

cap.release()
import tensorflow_hub as hub : The tensorflow_hub module is used to help load the Movenet model.
model = hub.load('movenet_singlepose_thunder_4') : This loads the Thunder model into the variable model. You can alternatively use Lightning here.
movenet = model.signatures['serving_default'] : Loads movenet.
outputs = movenet(image) : Loads the image into Movenet. It will then return the keypoints. Note that it will always return 17 keypoints, even if some of them are not visible.
keypoints = outputs['output_0'] : Extract the output. There is only one output ('output_0') from Movenet.
print(keypoints[0,0,1]) : Prints out the position of the left eye (...s/n 1). Note that the format is y, x, confidence. If you want to display a different keypoint, change the last number.
Run the program, then try moving around and see how the numbers change. What happens to the confidence level when the keypoint is not in view of the camera?
Code (Mark Keypoints)
In this example, we'll mark out the position of the keypoints on screen. This is great for visualizing the Movenet results, but it is not strictly necessary if you just need to control a robot or drone.
import tensorflow as tf
import tensorflow_hub as hub
import cv2
import numpy as np

model = hub.load('movenet_singlepose_thunder_4')
movenet = model.signatures['serving_default']

cap = cv2.VideoCapture(0)

success, img = cap.read()

h, w, _ = img.shape

while success:
    tf_img = cv2.resize(img, (256,256))
    tf_img = cv2.cvtColor(tf_img, cv2.COLOR_BGR2RGB)
    tf_img = np.asarray(tf_img)

    image = np.expand_dims(tf_img,axis=0)
    image = tf.cast(image, dtype=tf.int32)

    outputs = movenet(image)
    keypoints = outputs['output_0']

    for k in keypoints[0,0,:,:]:
        if k[2] > 0.3:
            yc = int(k[0] * h)
            xc = int(k[1] * w)

            img = cv2.circle(img, (xc, yc), 2, (0, 255, 0), 5)

    cv2.imshow('Movenet', img)

    if cv2.waitKey(1) == ord("q"):
        break

    success, img = cap.read()

cap.release()
h, w, _ = img.shape : Get the height and width of the original image.
for k in keypoints[0,0,:,:]: : Iterates through the 17 keypoints.
if k[2] > 0.3: : Check if the confidence level is greater than 0.3; if it's too low, it may be a false result. You can change this threshold to suit your needs.
yc = int(k[0] * h) : Multiply normalized (0 to 1.0) y coordinate of the keypoint by the height of the image to get it's y position.
xc = int(k[1] * w) : Same as before, but for width.
img = cv2.circle(img, (xc, yc), 2, (0, 255, 0), 5) : Draw a circle at the keypoint position.
Code (Compare and Scale)
If you plan to use Movenet to control something, you will often need to compare the position of two or more keypoints, and scale the result so that you can have a consistent result regardless of whether you are near or far from the camera.
This example demonstrates how to control an onscreen ball using movement from your right arm. It compares the x position of your right wrist to your right elbow to determine the position of the ball. It also scales the value against the distance between your right elbow and your right shoulder.
For this example to work right, you should keep your entire right arm in view of the camera, and your elbow should stay directly below your shoulder.
import tensorflow as tf
import tensorflow_hub as hub
import cv2
import numpy as np

model = hub.load('movenet_singlepose_thunder_4')
movenet = model.signatures['serving_default']

cap = cv2.VideoCapture(0)

success, img = cap.read()

h, w, _ = img.shape

while success:
    tf_img = cv2.resize(img, (256,256))
    tf_img = cv2.cvtColor(tf_img, cv2.COLOR_BGR2RGB)
    tf_img = np.asarray(tf_img)

    image = np.expand_dims(tf_img,axis=0)
    image = tf.cast(image, dtype=tf.int32)

    outputs = movenet(image)
    keypoints = outputs['output_0']

    shoulder = keypoints[0,0,6]
    elbow = keypoints[0,0,8]
    wrist = keypoints[0,0,10]

    upper_arm_length = ((shoulder[0] - elbow[0])**2 + (shoulder[1] - elbow[1])**2) ** 0.5
    x_pos = wrist[1] - elbow[1]
    x_pos = x_pos / upper_arm_length
    x_pos = int((x_pos * w + w) / 2)

    img = cv2.circle(img, (x_pos, int(h/2)), 2, (0, 255, 0), 5)

    cv2.imshow('Movenet', img)

    if cv2.waitKey(1) == ord("q"):
        break

    success, img = cap.read()

cap.release()
upper_arm_length = ((shoulder[0] - elbow[0])**2 + (shoulder[1] - elbow[1])**2) ** 0.5 : Calculates the length of the upper arm using Pythagoras' theorem.
x_pos = wrist[1] - elbow[1] : Calculate x position of wrist, relative to the elbow. We want the wrist position to be relative to the elbow, so that the result won't be affected by your position in the camera.
x_pos = x_pos / upper_arm_length : Scale the result by the upper arm length. This ensures that the result is not affected by your distance to the camera.
x_pos = int((x_pos * w + w) / 2) : Calculate the x position to draw the ball. Basically, we scale it by the image width, then add width to it and divide by 2 to ensure that the ball is at the center of the screen when the wrist is at the zero position.
img = cv2.circle(img, (x_pos, h/2), 2, (0, 255, 0), 5) : Draw the circle. We don't care about the y position in this exercise, so we'll just set it to half the height.
TensorFlow Lite
On weaker devices (eg. Raspberry Pi), you may find the performance of the above to be inadequate. You can switch to TensorFlow Lite to improve performance (ie. FPS) at the expense of accuracy.
Download the LiteRT / TFLite models from here...
https://www.kaggle.com/models/google/movenet/tensorFlow2
The "singlepose-lightning-tflite-int8" model provides the fastest performance, while the "singlepose-lightning" (...not in the filename, but this is a float32 model) provides better accuracy.
Whichever model you choose, unpack it to extract the ".tflite" file inside.
Sample code for marking keypoints is as follows...
import tensorflow as tf
import cv2
import numpy as np

# Only one of the following lines should be in use, comment out the other line!
interpreter = tf.lite.Interpreter(model_path="4.tflite") # This is for the int8 model
interpreter = tf.lite.Interpreter(model_path="3.tflite") # This is for the float32 model

interpreter.allocate_tensors()

cap = cv2.VideoCapture(0)

success, img = cap.read()

h, w, _ = img.shape

while success:
    tf_img = cv2.resize(img, (192,192))
    tf_img = cv2.cvtColor(tf_img, cv2.COLOR_BGR2RGB)
    tf_img = np.asarray(tf_img)

    image = np.expand_dims(tf_img,axis=0)

    # Only one of the following lines should be in use, comment out the other line!
    image = tf.cast(image, dtype=tf.uint8) # This is for the int8 model
    image = tf.cast(image, dtype=tf.float32) # This is for the float32 model

    input_details = interpreter.get_input_details()
    output_details = interpreter.get_output_details()
    interpreter.set_tensor(input_details[0]['index'], image.numpy())

    interpreter.invoke()
    keypoints = interpreter.get_tensor(output_details[0]['index'])

    for k in keypoints[0,0,:,:]:
        if k[2] > 0.3:
            yc = int(k[0] * h)
            xc = int(k[1] * w)

            img = cv2.circle(img, (xc, yc), 2, (0, 255, 0), 5)

    cv2.imshow('Movenet', img)

    if cv2.waitKey(1) == ord("q"):
        break

    success, img = cap.read()

cap.release()
LiteRT
If you installed LiteRT and not TensorFlow, you'll need to modify the above code a little...
from ai_edge_litert.interpreter import Interpreter
import cv2
import numpy as np

# Only one of the following lines should be in use, comment out the other line!
interpreter = Interpreter(model_path="4.tflite") # This is for the int8 model
interpreter = Interpreter(model_path="3.tflite") # This is for the float32 model

interpreter.allocate_tensors()

cap = cv2.VideoCapture(0)

success, img = cap.read()

h, w, _ = img.shape

while success:
    tf_img = cv2.resize(img, (192,192))
    tf_img = cv2.cvtColor(tf_img, cv2.COLOR_BGR2RGB)
    tf_img = np.asarray(tf_img)

    image = np.expand_dims(tf_img,axis=0)

    # Only one of the following lines should be in use, comment out the other line!
    image = image.astype(np.uint8) # This is for the int8 model
    image = image.astype(np.float32) # This is for the float32 model

    input_details = interpreter.get_input_details()
    output_details = interpreter.get_output_details()
    interpreter.set_tensor(input_details[0]['index'], image)

    interpreter.invoke()
    keypoints = interpreter.get_tensor(output_details[0]['index'])

    for k in keypoints[0,0,:,:]:
        if k[2] > 0.3:
            yc = int(k[0] * h)
            xc = int(k[1] * w)

            img = cv2.circle(img, (xc, yc), 2, (0, 255, 0), 5)

    cv2.imshow('Movenet', img)

    if cv2.waitKey(1) == ord("q"):
        break

    success, img = cap.read()

cap.release()