Digital Output
Blink
We can control the value of any of the Arduino GPIO (General Purpose Input Output) pins using the digitalWrite command. Here's an example...
void setup() {
  pinMode(13, OUTPUT);
}

void loop() {
  digitalWrite(13, HIGH);
  delay(1000);
  digitalWrite(13, LOW);
  delay(1000);
}
pinMode(13, OUTPUT) : By default, all the pins starts in the INPUT mode, this sets the mode of pin 13 to OUTPUT. We only need to do this once, so we'll put this line in setup.
digitalWrite(13, HIGH) : This sets pin 13 to HIGH. High means 5V on the Arduino UNO. We are using pin 13 as it is a little special, it has a built-in LED connected to it on the Arduino board. When we set pin 13 to HIGH, the LED will light up.
delay(1000) : This makes the Arduino wait for 1000ms (1 second).
digitalWrite(13, LOW) : This sets pin 13 to LOW. LOW means 0V. When we set pin 13 to LOW, the LED will turn off.
Upload the code to your Arduino. You should see an LED start to blink on your Arduino board. Try changing the duration of the delay and see what happens.
Blink (External LED)
Connect an external LED to your Arduino as follows...
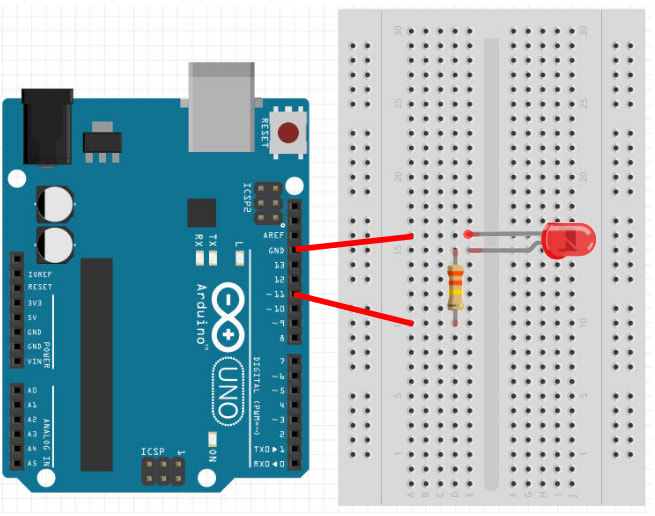
For the resistor, any value from 300 ohms to 2000 ohms should do fine. Pay attention to the length of the LED's legs; the short leg should be connected to Gnd while the long legs are connected to pin 11. If you do not wish to use pin 11, you can also use any of the other pins from 2 to 13.
Modify your earlier code to use pin 11 instead...
void setup() {
  pinMode(11, OUTPUT);
}

void loop() {
  digitalWrite(11, HIGH);
  delay(1000);
  digitalWrite(11, LOW);
  delay(1000);
}
Upload your code. If your wiring and code is correct, you should now see the external LED blinking.
Exercise
Write a program that makes the external LED and the built-in LED blink alternately. This means that when the built-in LED is on, the external LED should be off, and vice versa.